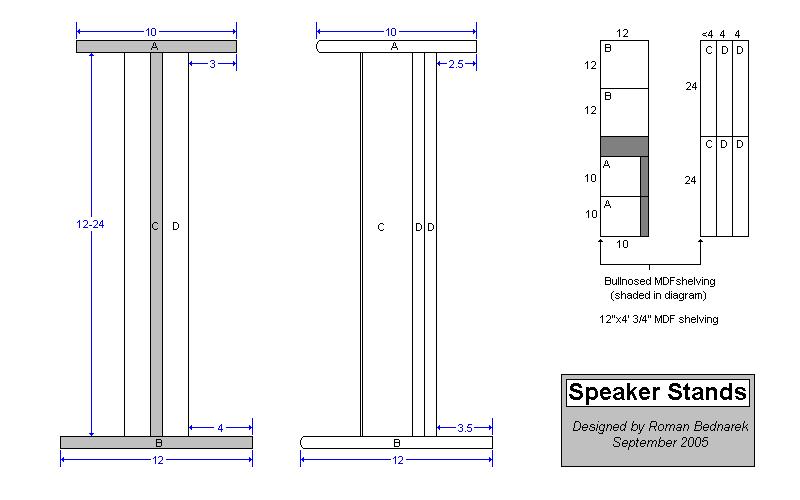

IntroductionThis project is a simple set of speaker stands that can be built very easily and at low cost. The basic version uses 3/4" MDF shelving that is available in 12" wide boards that are 48" long. These should be pretty common and usually run about $4 each. This project requires two of these shelves for a complete pair of speaker stands. I recommend that they be painted with whatever finish matches your listening room or speakers. With paint I estimate the total cost of this project to be under $15 for a complete pair of speaker stands. There are other options regarding building materials listed below.Design
Once the boards are cut I recommend that you glue the pedestal section together first. First laminate the two 4" wide boards together, then glue the remaining front board on to make the 'T'. Finally, glue the top and bottom plates on. If you plan to paint them then I would recommend mixing a 50/50 solution of Titebond (or wood glue) and water which should be brushed onto the exposed edges of the MDF to keep the paint from soaking in. I recommend a few coats of the watered down glue solution and then a bit of sanding once it is dry. If you are going for a really smooth finish then you'll probably want to put a few coats of primer on prior to painting the final coat. If you are using a textured type paint like truck bed liner for example then you may be able to skip the primer stage. There are some alternate ways of making these stands by using real wood instead of MDF. You can buy some hardwood boards and some common examples are pine, oak, maple and poplar. For the pedestals you can use planks that are 4" wide (which might be a bit narrower if they are finished boards which might be closer to 3.25" but they should still work). For the tops and bottoms you can either use some 1/2" or 3/4" plywood or laminate some hardwood planks together to get the right size. If you build them this way then you can stain and finish them to your liking (I use polyurethane a lot for a durable finish). You might want to stain the boards prior to glueing them together because if the glue drips during construction and you try to stain them after you might see the glue spots through the stain. Regardless of the materials used, you should be able to make these speaker stands for under $20 a pair which is a great value. I suggest that you determine the desired height and top plate dimensions prior to building them in order to ensure that they are ideally matched to the speakers that you plan to use them with. |
